Converting IKEA Sniglar Crib to Toddler Bed
As my little one starts to grow out of the crib stage, I’ve been wondering about the best way to convert my IKEA Sniglar crib into a toddler bed. The Sniglar can be easily modified into a toddler bed using either IKEA’s conversion kit, a DIY method, or even temporary modifications to use it as-is. The key is removing one side rail so they can get in and out on their own. This allows more independence while still providing safety with barriers like a front rail. Converting the crib I already own saves money too. Below I’ll share the main approaches to converting this popular crib model.

Methods to Convert IKEA Sniglar Crib to Toddler Bed
There are two primary ways to convert the IKEA Sniglar crib to a toddler bed. You can purchase IKEA’s conversion kit designed specifically for this crib, or take a DIY approach by modifying the crib on your own. There is also a third makeshift option if you want a temporary toddler bed setup.
Using the IKEA Conversion Kit for the IKEA Sniglar Crib
The easiest way to convert the Sniglar to a toddler bed is to purchase IKEA’s official conversion kit. This includes pre-cut wooden boards to replace the front rail and integrate safety features.
The key steps are:
- Buy the “Sniglar” conversion kit from IKEA.
- After that, take an Allen wrench or screwdriver. Now, remove the screws around the front rail. Take off the front and right side rails.
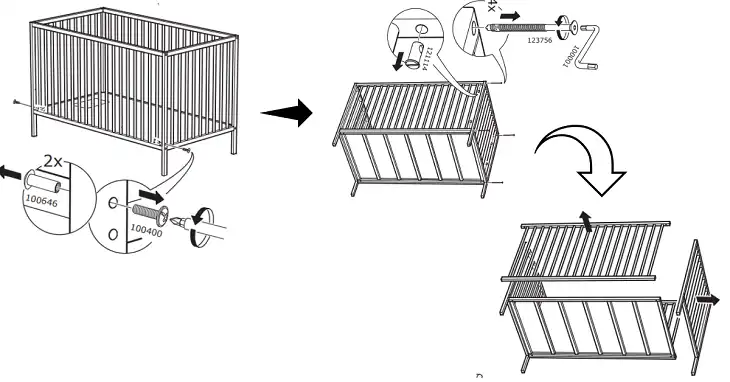
- Next, insert the conversion kit boards in place of the front rail. They should slide into the same slots securely and insert the removed screws properly to make the board fit and stable.
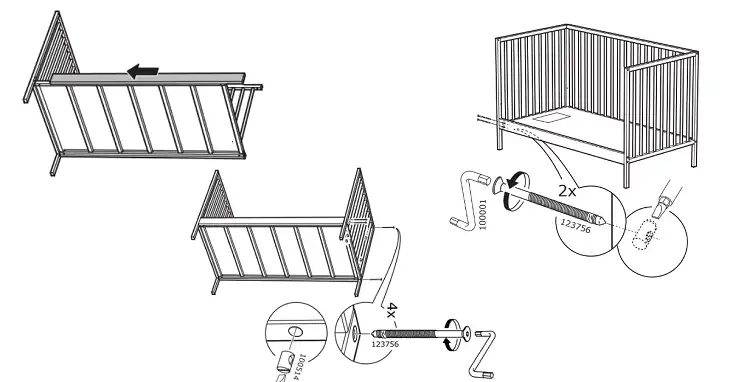
- The kit includes a shorter bar to install across the front halfway up. This prevents falls but still allows easy access for your toddler.
The IKEA conversion kit offers an easy, pre-made solution for transitioning your Sniglar crib. The parts integrate seamlessly and allow you to transform the crib in minutes with no specialized tools required.
DIY Method
For a more hands-on approach, you can convert the IKEA Sniglar crib to a toddler bed with some simple DIY modifications. This may save on costs compared to buying the kit.
Here are the key steps for a DIY conversion:
Step 1 – Cut the Sniglar Crib Legs According to Your Need
You may want to shorten the crib’s legs to make it safer and easier to access for your toddler. Use a saw to cut off the desired length from each leg. Sand and finish the cut edges.
Step 2 – Cut the Front Rail in Half
Using a saw, cut the front rail/guardrail in half. Also, cut the quarter portion of the front rail to create an opening for your toddler to get into the crib.
Step 3 – Setup the Front Bars into the Crib
Reattach the shortened legs and the modified front bar (with or without the additional guardrail) back onto the crib frame. This acts as a safety barrier like the IKEA conversion kit.
The DIY method requires more work but allows you to customize sizing and save on conversion kit costs. Make sure to sand any rough edges and test the bed for stability and safety before use.
Using the Crib As-Is with Modifications
If you are looking for a temporary toddler bed solution before fully converting the crib, you can make some simple modifications to use the Sniglar crib as-is for the time being. This can buy you time before investing in a conversion kit or doing DIY work.
To use the Sniglar as a makeshift toddler bed without converting it, leave one side railing down so your child can access the bed. Make sure to secure the other side rails in the upright locked position for safety. You will want to take some precautions to prevent falls since the mattress will be raised without a front railing.
One easy option is to place pillows, blankets, or cushions alongside the lowered crib rail to cushion the edge. Use soft bedding that is 6-12 inches thick when compressed so it is level with the mattress. This creates a safe barrier along the open edge.
You can also use a large, flat twin-sized blanket or padded cover to go over the mattress. Tuck it firmly under the mattress on all sides, letting it drape over the lowered crib rail side. This effectively creates a cushioned mat that extends the surface and prevents rolls off the bed. Just be sure whatever bedding you use is secure and covers the entirety of the exposed side.
While not a perfect long-term solution, these simple modifications allow you to convert the use of the Sniglar crib temporarily. It postpones the need for disassembling the crib while giving your toddler more space and freedom. Just take care to monitor the setup closely for safety. Then when you are ready, you can move forward with one of the more permanent conversion methods.
Wrapping Up
Overall, converting my IKEA Sniglar crib to a toddler bed was simple. I didn’t even need to buy a separate bed. Removing one side railing and adding cushions or convertible rails made it easy for my toddler to access while preventing falls. While a temporary setup worked at first, I’d recommend using IKEA’s kit or DIY bars for the best safety and durability. The Sniglar converted really well to a toddler bed frame. I’m glad I could extend the life of my crib and save money in the process. My little one loves the independence of their “big kid bed”!